You’ve finally made it to CoinGames! Let us give you a very warm welcome to our fully decentralized online casino. In our casino, we put our users first and strive towards fully improving our platform, in a manner that will ultimately facilitate every single step that our players need to take before playing. In this article, we will be outlining a detailed step-by-step guide for our new and seasoned users on how to navigate our platform, connect the wallet, deposit, swap and play.
First of all, you will need to make sure that you have a crypto wallet equipped with funds. If you already have a wallet with currency, you can skip over to the “CoinGames Registration and Swap” section below. If you need directions on how to get your wallet started, follow the steps below.
Crypto Wallet Installation and Configuration
- At CoinGames, we accept three types of wallets for registration to the platform: MetaMask, Coinbase and Trust Wallet. You can choose to install these wallets as browser extensions or mobile apps. This is the first choice you need to make.
- If you are downloading the mobile app, to avoid falling victim to these scams, make sure you download the official MetaMask, Coinbase and Trust Wallet app from the app store on your device, and not from any other source. The configurations are available on both iOS and Android. Once you have downloaded the app(s), you can start creating your wallet (Start Crypto Wallet and Buy)
- If you are going to use the browser extension version of the wallets, these are the steps you need to take:

- MetaMask – You can visit https://metamask.io/ and click on download. On CHROME, click “Install MetaMask for Chrome”. You will be directed to the Chrome Web Store. Click “Add to Chrome”. On the pop up, click “Add extension”. Once the extension is added, MetaMask will automatically open. On FIREFOX, hit “Install MetaMask for Firefox”. In the new window that opens, click on “Add to Firefox”. On the pop up, click “Add”. After adding MetaMask Extension, you’ll return to your browser page. MetaMask will appear on your browser; click on it to open MetaMask. On EDGE, Hit “Install MetaMask for Edge”. In the new window that opens, click “Get”. On the pop up, click “Add Extension”. After adding MetaMask Extension, MetaMask will automatically open.
- Coinbase Wallet – Visit https://www.coinbase.com/wallet/downloads and choose your download option – keep in mind if you are using an extension, you’ll be able to download it on Chrome and Brave. You will be redirected to the Chrome web store, where you’ll be asked to add the extension. The extension should then be visible on the top right-hand corner of your screen, next to the search menu bar.
- Trust Wallet – Visit https://trustwallet.com/browser-extension/ and click on “Get Trust Wallet”. Trust Wallet is available on Chrome, Edge, Brave, Opera and more. You will then be asked by the relevant browser to add the extension, which will then appear on the top right-hand side.
- Once you have chosen your preferred wallet and downloaded the app on mobile or the extension on your browser, open the configuration and you are now ready to set up your wallet.
Start Crypto Wallet and Buy
MetaMask
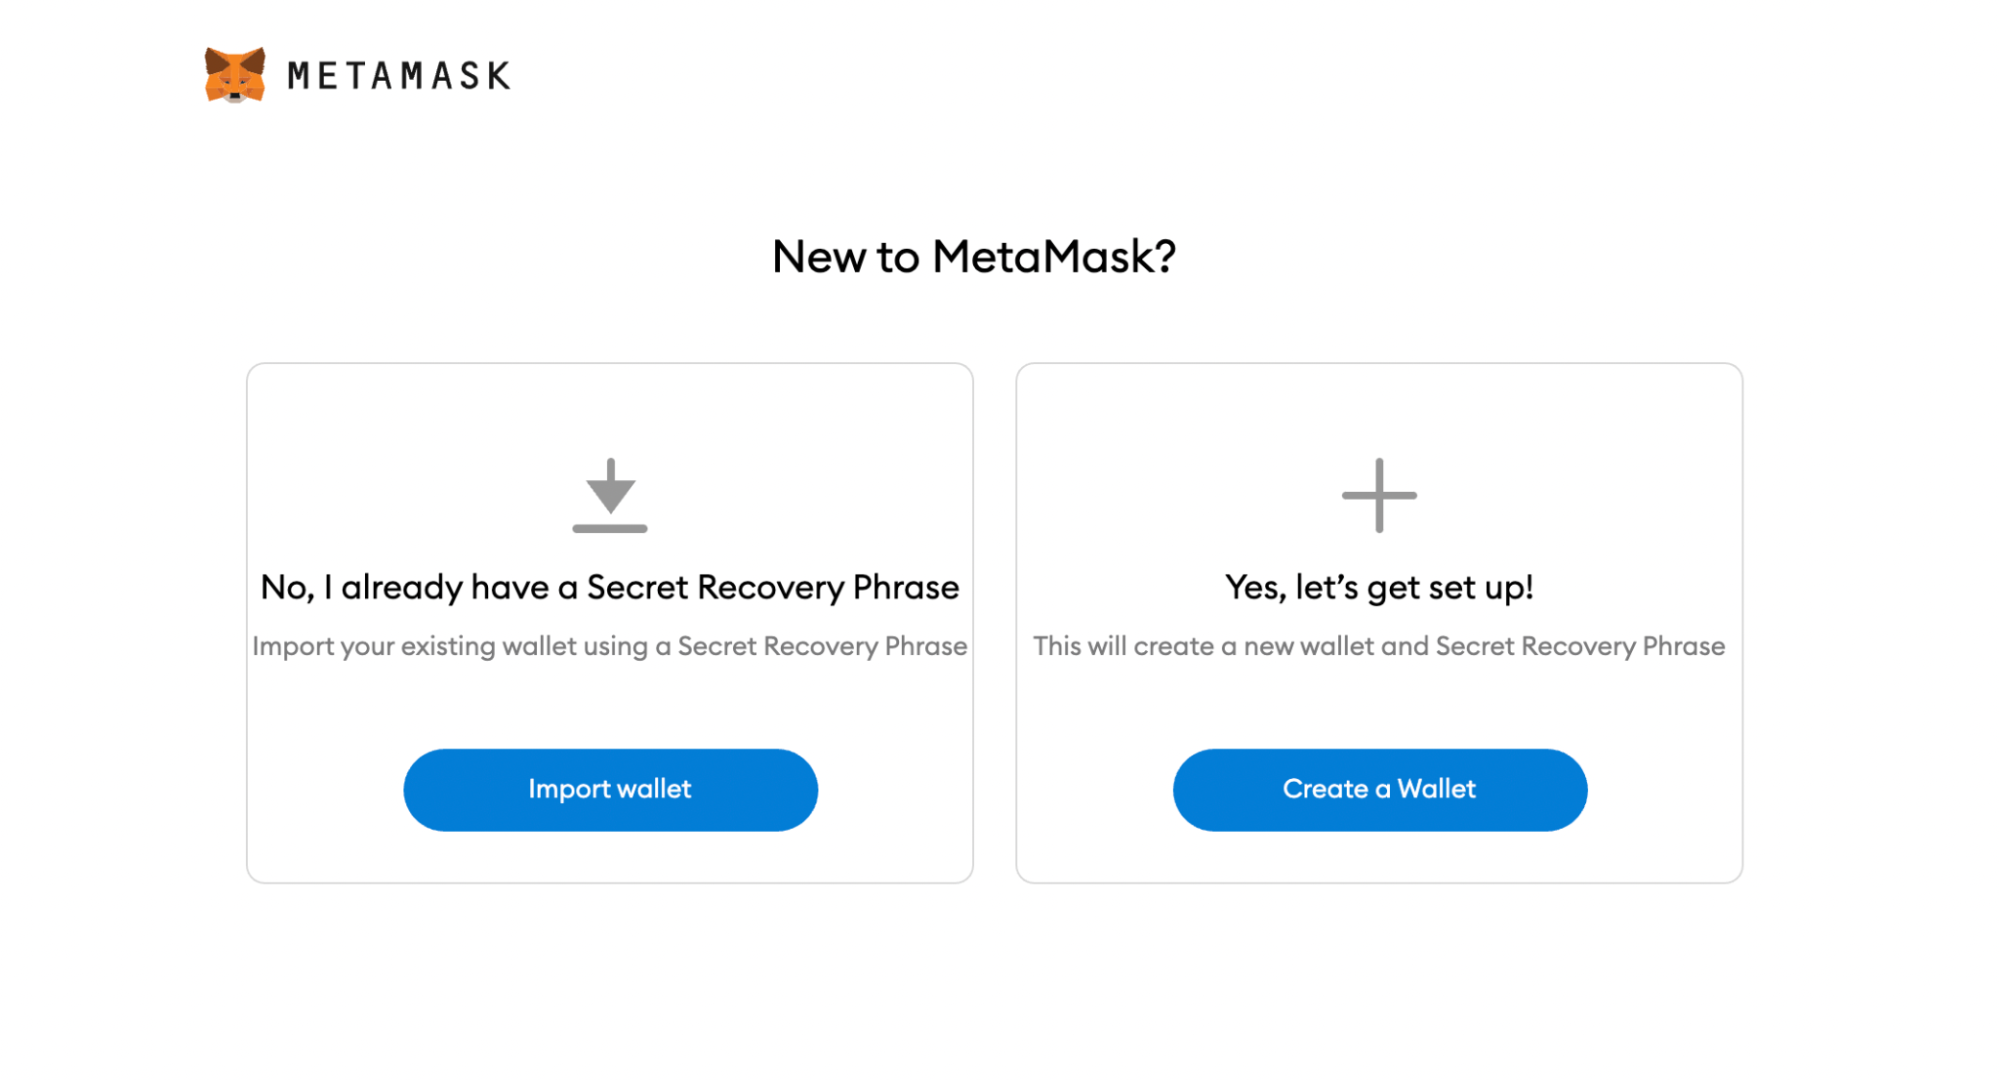
- Click the “Get Started” button and you’ll be taken to the next page and presented with two options: “No, I Already Have a Secret Recovery Phrase”, or “Yes let’s get set up!” – the first option is for users that already have a MetaMask account on a different device, while the second is for users that want to create a brand new MetaMask wallet.
- Select the “Create a Wallet” option and create a password when prompted. As with any password, it’s vitally important you physically write several copies of the password down on different pieces of paper. You should never create a digital copy of any password you create; this includes actions like taking a screenshot of it, sending it to yourself in an email or saving it as a note on your computer.
- Keep in mind you will need to enter your password every time you access the wallet. The next page will outline what a recovery phrase is: a recovery phrase is made up of 12 random words that act as a backup in case your device is lost or stolen. You will need to carefully copy down each word in the correct order, and MetaMask will then ask you to insert the phrase before moving on.
- Once you’ve completed these steps, you are now able to access and use your brand new MetaMask wallet. Read the steps below to learn how to buy crypto on MetaMask.

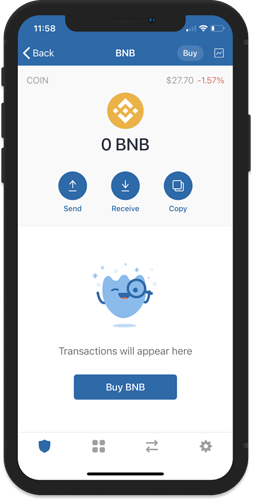
- On the mobile app and on the extension, head to your wallet homepage and find the blue ‘Buy’ button, located between the ‘Receive’ and ‘Send’ buttons in the center of the screen.
- If you’re a first-time user, you must select your region, which will generally default to your current location. If you’ve used this feature before, MetaMask skips this step and uses the region you selected last time, which is saved in local storage. From the drop-down menu, search or scroll until you find the country where your payment method (card/bank account) is registered.
- On the next screen, select your payment method (you can always adjust this afterwards if you change your mind). You can then select the token you want to buy, using the You want to buy menu at the top of the screen. Insert your preferred amount, i.e. the value (in fiat) of the token you want to buy. You will then be asked to select a quote and provider, after which you will receive the crypto in your wallet in a matter of minutes, if not seconds. Keep in mind, if you haven’t used any of the providers before, you may need to complete a KYC process.
Coinbase Wallet
- If you have downloaded the app or added the extension, you can click on “Create New Wallet”. You can then enter a username. (This is how other Coinbase Wallet users can find you. Note that you can only change your username once a year.)
- You will then be asked to set your username privacy preferences. Then you will choose your preferred security method: Biometrics or passcode. And then you’ll have, like on MetaMask, to back up your 12-word recovery phrase and re-enter it to confirm the back up.
- Your wallet set up will be complete once you’ve confirmed the back up. You can now move on to acquiring crypto: Read the steps below to learn how to buy crypto on Coinbase.
- Once you have finished setting up your Coinbase wallet, you just need to link your Coinbase account to your wallet before buying crypto. To sign up for an account through the wallet, you can sign in through your wallet, tap the Buy icon on the home page menu, Tap Connect my Coinbase account, and follow the remaining steps that will ask you to verify your email, payment method and identity.
- Once you have completed the steps, you are now ready to buy crypto on Coinbase wallet. Follow the steps below.
- On the Assets tab inside Coinbase Wallet, tap the Buy button, tap the token you’d like to purchase, then enter the amount you’d like to buy. If needed, change the Source of funds to your desired payment or transfer method. Then, tap “Preview buy”. You can then Review the transaction details, including which network you would like to send funds to (e.g. Ethereum, Polygon, Optimism) if applicable, select “Confirm”, and the funds should show up in a matter of minutes in your wallet.
Trust Wallet
- Once you have downloaded the Trust Wallet app or extension, select “Create a new wallet” and press “Continue” to accept the terms. On the extension, you will be asked to create a password. You will then be asked to write down your recovery phrase. It is important you manually write it down and keep it in a safe, private place.

- Just like the recovery phrases for MetaMask and Coinbase, the phrase for Trust Wallet also consists of 12 words. To verify your recovery phrases backup, Trust Wallet will ask you to write them in sequential order as you’ve received them.
- Once you successfully insert the phrase in the correct order, you will be taken to a page stating, “your wallet was successfully created”. You are now ready to buy crypto for your Trust Wallet.
- On your wallet’s home screen, you can click on the “Buy” icon on the homepage that will take you to a selection of cryptocurrencies that are available on the wallet for acquisition.
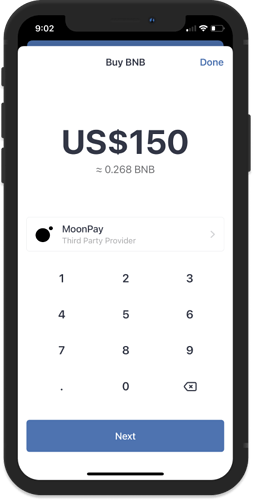
- Once you’ve selected the currency you want to buy, you can input the amount you want to buy on the page that appears. You will then be shown the different third-party providers you can choose from to complete the acquisition – keep in mind you may have to create an account for some and complete a KYC process, like for example Binance Connect, meaning you will need a Binance account, or MoonPay, depending on which offers the best rate.
- You can also select the fiat currency you’d like to swap in the top right-hand corner of the screen and then click on next. You will be redirected to the third-party provider page, where you’ll need to input the amount and choose your payment method (ex. Credit card, Apple Pay, etc.).
- You can complete the acquisition by clicking on the continue button below – keep in mind some third-party providers will ask you to log in to their page (for example Binance Connect will ask you to log in to your Binance account). Following this step, you should find the acquired funds in your Trust Wallet in a matter of minutes.
CoinGames Registration
Once you have installed and created your preferred wallet, and bought the cryptocurrency of your choice, you are now ready to connect to the CoinGames platform and take the relevant steps before starting to play. You will need to connect your wallet to the platform, then swap the currency of your choice into DEGA, the tokenized fiches that are used by all our players to bet on a variety of games, and finally deposit the DEGA in order to start a game session. Let’s begin.
- Once you have completed all the steps regarding your wallet and its funds, head over to coingames.fun. You can connect your wallet by clicking on the top right-hand corner of your screen the “Connect” option in pink. On the mobile version it will be the same passage.

- You will then be presented with the three choices of wallets you want to connect to: MetaMask, Coinbase or Trust Wallet. Click on your preferred option.
- The extension or mobile app will then pop up a request “Sign this message?”, click on sign.
- If this is not your first time connecting on CoinGames, you can proceed to step 5. If this is your first time connecting on CoinGames, or the first time using a new wallet, you will be able to progress by filling out a quick form asking for your name, email and country. Once you have completed these steps, a “Registration Completed” pop up will appear: you are now connected on CoinGames.

Add BNB to Your Wallet
- Before swapping your currency for DEGA, we suggest to all our users to buy any amount of BNB tokens through their DeFi wallet, or to send it to your connected wallet from an exchange like Binance, Coinbase or others, as it facilitates and accelerates the swap process. But of course, you can choose your own currency to swap as well. We also recommend having a small amount of BNB in your wallet because it is the native currency of the BNB chain, on which we operate, and it is used to pay the infinitely small fees to the blockchain, usually just a few cents.

Swap Process
- Now you are ready to swap your desired currency for DEGA, our unique currency. You can swap by clicking the “Need DEGA? Get it Here” button at the bottom-right hand corner of the page. You can then choose the amount and the currency you wish to swap, and you will be able to see the amount of DEGA you will receive, plus the gas fee involved in the transaction. If the amount is correct, you can proceed by clicking “Swap” in blue at the bottom of the page.

- You will then be asked by your wallet to confirm the transaction. Once you confirm it, a pop up will appear at the bottom of your screen with a green check mark, indicating the transaction has been successful.
- Now it may be that your transaction has been successful, but you may not be able to see the swapped DEGA in your wallet: why is this? This is because you need to add DEGA on your Metamask, which you can do at the bottom of this page: https://app.decentralizedgambling.io/swap.

- Once you have added DEGA to your wallet, you should be able to see the swapped DEGA in your wallet. If that is the case, you are now ready to deposit the funds and start a game session.
Deposit Process
- Once you have DEGA in your wallet, you can start the Deposit process by clicking on your profile icon in the top-right hand corner of the CoinGames home page, after which you can click on the pink “Deposit” icon under your profile stats.
- You will be taken to the Deposit page, where you are able to see, progressively, the DEGA balance in your wallet, in the Vault, and finally in your deposited balance. Under those three icons, you are able to choose the mount of DEGA you would like to deposit, based on the quantity available in your wallet. Once you have chosen the quantity of DEGA, click on the pink “Deposit” icon at the bottom of the page”.

- A pop up will then appear asking to “Give permission to access your token”, with the remaining balance left in your wallet and the gas fee involved in the transaction. If all seems correct, click on the blue “Approve” icon.
- You will be redirected to a CoinGames page with three steps called “Initialize”, “Move to Vault” and “Move to my Balance”. The page will read “Allowance in progress”. In a few seconds, the initialize section should be occupied by a green check mark and your transaction will be completed. Now the Vault deposit operation will automatically start
- You will now be asked to “Confirm” the movement of the funds into the vault, which you can do by again clicking the blue icon on the right side.
- You will be redirected back to the earlier page, which will read “Transaction in progress.” After a few seconds, the confirmation will arrive and you will have to sign a last message, again through a blue icon saying “Sign” on the right side. Once you’ve completed this last step, all three sections should be occupied by green checkmarks and the page will read “Transaction Completed”: your DEGA has successfully been deposited into the platform and you should be able to see your balance in the original Deposit page, as well as in your dashboard section.
Play Directly With Crypto
16. BUY: If you do not own crypto, you can buy BNB or MATIc directly on the Deposit page.
- Use fiat currency to buy crypto directly.
- You chosen currency and amount are directly swapped into DEGA.
- Deposit into CoinGames. You’re ready to play.
Keep in mind, you will only be able to buy BNB if your wallet is connected to the BSC. You will only be able to buy MATIC if your wallet is connected to POLYGON. To change chain, click on the top right icon in the home page.

17. SWAP: If you have crypto, your deposit is automatically swapped into DEGA.
- Have BNB/MATIC/USDC/USDT in your wallet.
- Deposit desired currency and amount into CoinGames.
- Ypur deposit is automatically swapped into DEGA. You’re ready to play!

18. DEPOSIT:
- Have crypto in your wallet.
- Choose the amount and currency you want to deposit.
- Your currency is deposited and automatically swapped into DEGA.
Keep in mind, once a user makes a deposit in a particular currency, the user will need to play or withdraw the entirety of their balance before being able to make a deposit in another currency.
Also keep in mind that no matter what currency you deposit, your balance will always be shown in DEGA. Essentially, once you deposit your preferred currency, it will automatically be swapped in DEGA.
Withdrawal Process
- Once you’ve decided to call it a day, you can easily withdraw your funds from the platform. Head over to the withdrawal page (next to the buy and deposit sections). Here you will be able to withdraw your entire deposited balance, and you will also be able to see your current wallet balance in DEGA. You can now click on the pink “Withdraw” button at the bottom.

- You will then be taken to a page saying “Transaction in progress”; after a few seconds, you will be asked to sign a message in your wallet. Go ahead and click sign. Once you have completed this action, the page will inform you that the checkpoint has arrived and your DEGA tokens have been transferred to the Vault.

- A page will automatically appear now asking you to confirm the transaction from the Vault to your wallet. Click the blue “Confirm” button to proceed with this action.
- After a few seconds, you will be taken back to the withdrawal page, where you will get confirmation in the form of two green checkmarks and the phrase “Transaction Completed”, indicating that the funds have been returned to your wallet successfully.

Importantly, keep in mind that the DEGA you withdraw will be automatically swapped back into the currency you originally deposited in, and will be displayed accordingly in your Wallet.
You are now ready to play on CoinGames: have fun!

